
Android introduced BottomNavigationView in API 25.1 and I like it. To be honest, one of the biggest difference between iOS and Android for me was the placement of tabs. I enjoyed ActionBar tabs when they were a thing and loved the fact that I could swipe the tabs as I wished. But, when I used the bottom tabs in Android recently, I fell in love instantly. In today’s world of giant smartphones, one can only reach the bottom of the device during one-handed operations, so I loved the fact that I could use my hardware back button to navigate back and switch between tabs all with a single thumb.
BottomNavigationView does not have a swiping action out of the box (and for good reason), it allows three items to have icon and title with a selection animation. More than three tabs turn into icon only until selected mode. Of course there is a way to customize all that to your needs.

Covered in this tutorial:
In this tutorial, I will go over setting up the BottomNavigationView itself. Then, I will marry it to ViewPager that will allow a nice swiping action between tabs.
Not covered in this tutorial:
I will not cover customizing the BottomNavigationView anymore than simply giving it a selection/accent color. This can come later.
Steps:
-
- Setup
BottomNavigationView - Setup
ViewPager - Link
BottomNavigationViewandViewPager
- Setup
Let’s get started.
Step 0: Getting started
Let’s start by creating a solution in Visual Studio for Mac (my IDE for this tutorial).

Since I am dealing with Fragments, I will change my MainActivity base class to Android.Support.V4.App.FragmentActivity, and yes we will be using Android Support library V4.
public class MainActivity : Android.Support.V4.App.FragmentActivity
Now, let’s create a layout for our MainActivity. We will add a FrameLayout to hold our Fragment, a ViewPager, and a BottomNavigationView from the Android.Support.Design library,
Resources\layout\Main.axml
  <RelativeLayout xmlns:android="http://schemas.android.com/apk/res/android"
     xmlns:app="http://schemas.android.com/apk/res-auto"
     android:orientation="vertical"
     android:id="@+id/activity_main"
     android:layout_width="match_parent"
     android:layout_height="match_parent">
     <FrameLayout
         android:id="@+id/fragment_content"
         android:layout_width="match_parent"
         android:layout_height="match_parent"
         android:layout_above="@+id/bottom_navigation" />
     <android.support.v4.view.ViewPager
         android:id="@+id/viewpager"
         android:layout_width="match_parent"
         android:layout_height="match_parent"
         android:layout_above="@id/bottom_navigation" />
     <android.support.design.widget.BottomNavigationView
         android:id="@+id/bottom_navigation"
         android:layout_width="match_parent"
         android:layout_height="56dp"
         android:layout_gravity="start"
         android:layout_alignParentBottom="true"
         android:background="@android:color/white"
         app:menu="@menu/navigation_main" />
 </RelativeLayout>
Let’s create a layout for Fragment as well. We will keep it simple with an icon and a label.
Resources\layout\TheFragmentLayout.axml
 <RelativeLayout xmlns:android="http://schemas.android.com/apk/res/android"
     android:layout_width="match_parent"
     android:layout_height="match_parent">
     <ImageView
         android:id="@+id/imageView"
         android:src="@drawable/abc_ic_star_black_48dp"
         android:layout_width="wrap_content"
         android:layout_height="wrap_content"
         android:layout_centerInParent="true" />
     <TextView
         android:id="@+id/title"
         android:layout_width="wrap_content"
         android:layout_height="wrap_content"
         android:layout_centerInParent="true"
         android:text="Fragment"
         android:textAlignment="center"
         android:textSize="@dimen/abc_text_size_display_1_material"
         android:layout_below="@id/imageView"
         android:layout_centerVertical="false" />
 </RelativeLayout>
Step 1: Setup BottomNavigationView
Let’s get to that bottom navigation. First, we need the navigation items (tabs) for the BottomNavigationView, we will add a navigation menu for this.
Navigation Menu:
Resources\menu\navigation_main.xml
 <menu xmlns:android="http://schemas.android.com/apk/res/android"
     xmlns:app="http://schemas.android.com/apk/res-auto">

     <item
       android:orderInCategory="0"
       android:id="@+id/menu_genres"
       android:enabled="true"
       android:title="Genres"
       android:icon="@drawable/tab_genres"
       app:showAsAction="always" />

     <item
       android:orderInCategory="1"
       android:id="@+id/menu_titles"
       android:enabled="true"
       android:title="Titles"
       android:icon="@drawable/tab_titles"
       app:showAsAction="always" />

     <item
       android:orderInCategory="2"
       android:id="@+id/menu_stream"
       android:enabled="true"
       android:title="Stream"
       android:icon="@drawable/tab_stream"
       app:showAsAction="always" />

     <item
       android:orderInCategory="3"
       android:id="@+id/menu_showtimes"
       android:enabled="true"
       android:title="Showtimes"
       android:icon="@drawable/tab_showtimes"
       app:showAsAction="always" />
 </menu>
Notice the orderInCategory, this is the order of tab items from left to right.
Alright, so far so good. We have put together the views we will be working with. Now let’s get to that BottomNavigationView.
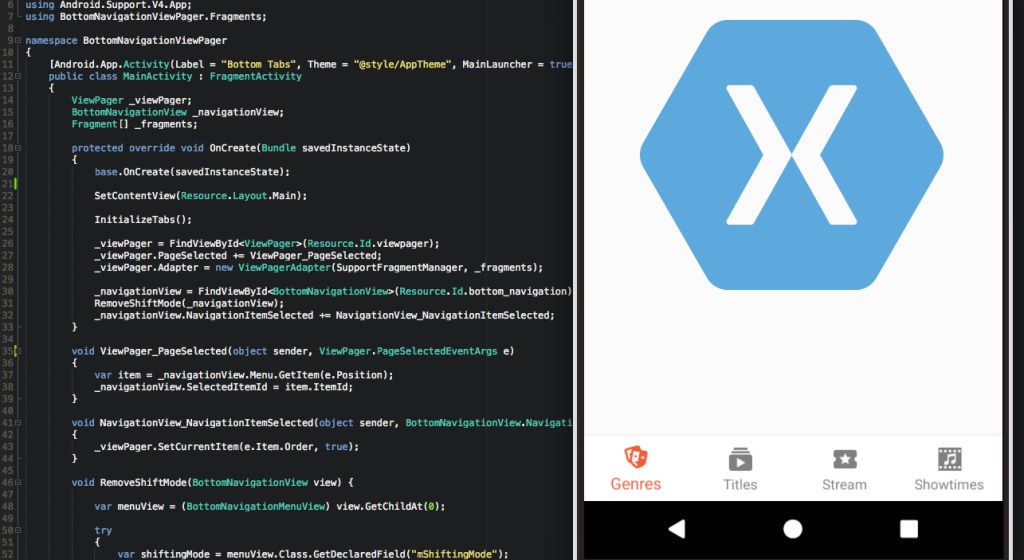
In MainActivity get hold of the BottomNavigationView and set it up.
// find the view
_navigationView = FindViewById<BottomNavigationView>(Resource.Id.bottom_navigation);
If you run the app now, you will see this,

what happened here. Well, the BottomNavigationView hides the labels if the tabs grow more than 3. So, let’s change that. Add this helper method to your code and call it when setting up the BottomNavigationView like this,
// under the setup
RemoveShiftMode(_navigationView);
...
void RemoveShiftMode(BottomNavigationView view) {
    var menuView = (BottomNavigationMenuView) view.GetChildAt(0);
    try
    {
       var shiftingMode = menuView.Class.GetDeclaredField("mShiftingMode");
       shiftingMode.Accessible = true;
       shiftingMode.SetBoolean(menuView, false);
       shiftingMode.Accessible = false;

       for (int i = 0; i < menuView.ChildCount; i++)
       {
           var item = (BottomNavigationItemView)menuView.GetChildAt(i);
           item.SetShiftingMode(false);
           // set checked value, so view will be updated
           item.SetChecked(item.ItemData.IsChecked);
       }
   } catch (System.Exception ex) {
       System.Diagnostics.Debug.WriteLine((ex.InnerException??ex).Message);
   }
}
And now, we should be okay.

And that’s it. we are done with setting up the BottomNavigationView. We have not implemented the fragments for each tab yet, so tapping on the tabs won’t present anything. We will present the fragments inside the ViewPager.
Step 2: Setup ViewPager
Now, let’s setup the ViewPager. First, the adapter,
Adapters\ViewPagerAdapter.cs
public class ViewPagerAdapter : FragmentPagerAdapter
{
    Fragment[] _fragments;

    public ViewPagerAdapter(FragmentManager fm, Fragment[] fragments) : base(fm)
    {
        _fragments = fragments;
    }

    public override int Count => _fragments.Length;

    public override Fragment GetItem(int position) => _fragments[position];
}
then, the ViewPager,
// find the view
_viewPager = FindViewById<ViewPager>(Resource.Id.viewpager);

// set the adapter
_viewPager.Adapter = new ViewPagerAdapter(SupportFragmentManager, _fragments);
and that should be it for setting up the ViewPager.
Step 3: Link BottomNavigationView and ViewPager
When the user slides between ViewPager views, ViewPager.PageSelected event is fired. Similarly, when the user taps on a tab (navigation menu item) in the BottomNavigationView, the BottomNavigationView.NavigationItemSelected event is fired. We have to link these two events to make the BottomNavigationView and ViewPager dance in sync. Here’s how we’re going to do it.
Declare an event handler for BottomNavigationView and ViewPager as follows,
// wireup the page selection event
_viewPager.PageSelected += ViewPager_PageSelected;

// wire up the selection event
_navigationView.NavigationItemSelected += NavigationView_NavigationItemSelected;
When the ViewPager page is selected, we notify the BottomNavigationView and vice versa. Like this,
 private void ViewPager_PageSelected(object sender, ViewPager.PageSelectedEventArgs e)
 {
     var item = _navigationView.Menu.GetItem(e.Position);
     _navigationView.SelectedItemId = item.ItemId;
 }

 void NavigationView_NavigationItemSelected(object sender, BottomNavigationView.NavigationItemSelectedEventArgs e)
 {
     _viewPager.SetCurrentItem(e.Item.Order, true);
 }
And that’s it. Now the BottomNavigationView and ViewPager are displaying the selected fragment/page/tab and updating each other with a smooth transition.
One last thing, load fragments for these tabs.
 void InitializeTabs()
 {
     _fragments = new Fragment[] {
         TheFragment.NewInstance("Genres", "tab_genres"),
         TheFragment.NewInstance("Titles", "tab_titles"),
         TheFragment.NewInstance("Stream", "tab_stream"),
         TheFragment.NewInstance("Showtimes", "tab_showtimes")
     };
 }
Like and/or leave a comment below, your feedback is always welcome 🙂
Get the complete code at : https://github.com/hnabbasi/BottomNavigationViewPager

Leave a comment